A button with a configurable label and two operating modes: normal and toggle. An additional ghost input can control the button remotely.
Inputs
- Title (String)
- Toggle (Number, Bool)
- Ghost (Number,Bool)
Outputs
- State (Number,Bool)
A button with a configurable label and two operating modes: normal and toggle. An additional ghost input can control the button remotely.
A single slider with configurable minimum, maximum value, tick marks (count and stop on ticks).
A simple text field for input which outputs the entered string.
This patch is really, really simple. You can enter a number in the inspector and it outputs this number. You can use it as a constant if you have a re-occuring number in many other calculations.
The Divide Patch does exactly what the name says. You can input two numbers (A and B) and the patch sets the output to C=A/B.
The toggle patch changes its output value (1<->0) only on a rising edge from the input.

The MIDI Input patch is one of the more complex patches. It has no inputs and all of the settings are done using the inspector. It has one standard output, status, which is 1 if you are connected to the device and 0 if not.
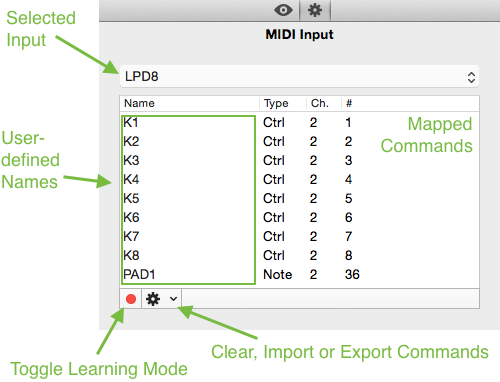
The drop down with the label “LPD8” is for selecting your input, it is possible that there is the same name multiple times, due to some devices having multiple inputs. The table gives you an overview over your commands with the name column being editable and the type,channel and number columns not editable. Using the red dot (Toggle Learning Mode) you can map new commands. Using the gear-button (action button) you can clear, import or export your mapping.
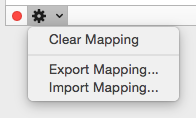
You can export your mapping to a comma-seperated values file and import it in other projects. The file format is quite simple and you can make mappings without Apricum, using a Spreadsheet Application or simple Text Editor. The format:
Type (C for Control, N for Note), Channel, Number (Note/Control#),Name
for example:
C,0,5,Slider #5

C,0,6,Slider #6

N,0,2,Button C
With the state saver you can keep an input saved (cached). If the signal input is 1 the value on the input is saved. While the signal input is 0 the last saved input value is still on the output of the patch.
Keeps a value between an upper and a lower bound. For example if the lower bound is 3 and the upper bound is 8, the value will always be a number between 3.0 and 8.0. The lower bound may not be greater than or equal to the upper bound.
Performs the modulo operation on a with n (a mod n). For example: 7 mod 2 will return 1.